React-Redux Frontend Architecture
This post is about how we used React in combination with Redux in our project, to create a frontend architecture, in which the code we write is easy to test, maintain and extend.
The categories of the architecture
We divided the files in our project in seven categories:
- (Stateless) Components
- Redux Containers
- Action Creators
- Controllers
- Reducers
- Selectors
- APIs
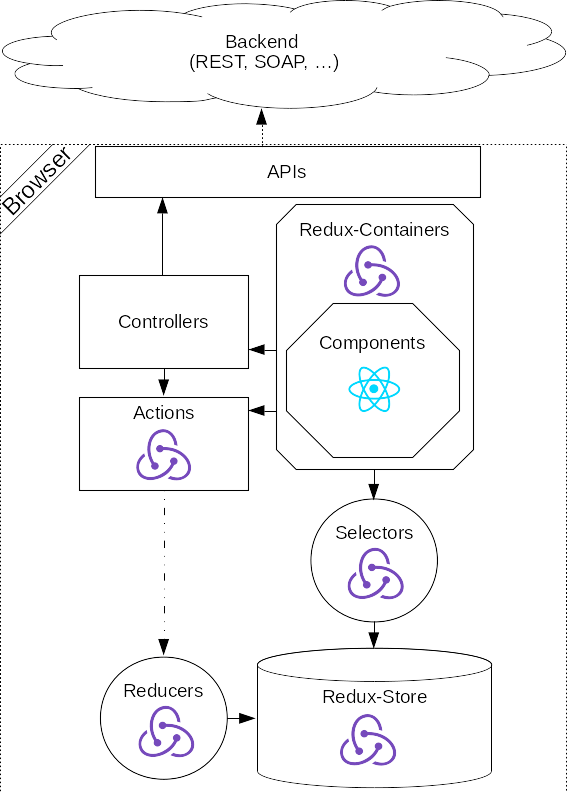
How the different categories work together can be seen in the following graphic:

Most of the categories are marked with either the react-icon


Categories marked with an icon are a common principle of the library, which the icon represents. Looking at the graphic, you can see that most of the categories are already a common part of either the react or redux library. Only the “Controllers” and the “APIs” categories are different. These categories provide abstractions, which make it easier to maintain and improve the code.
As seen in the graphic, components seem to always be inside a container. However, components do not necessarily need to be in a container to be used. Sometimes components are used directly in other components and get their properties in the components which are inside a container:
const ComponentWithContainer = (
    {valueA, valueB, callbackA}) => {

    return (
        <div>
            <p>{valueA}: {valueB}</p>
            <ComponentWithoutContainer
                doStuff={callbackA}
            />
        </div>)
}

export default connect(...)(ComponentWithContainer)
The APIs category contains APIs to communicate with webservices in the backend, but it can also encapsulate other APIs, like e.g. an API to legacy code in the frontend or an API to a third-party frontend library like a tracking-API.
Controllers contain more complex logic and use the APIs and the Action Creators to fulfill their work. The Controllers use the Action Creators to e.g. chain multiple Actions and API calls together by using promises. In the following example, we are using thunk to be able to use function callbacks in addition to action creators.
import * as backend from '../api/backendRest'
import * as actions from '../actions/someActions'

export function someController() => {
    return (dispatch, getState) => {
        return backend.fetchSomeData()
            .then((json) => {
                dispatch(actions.actionA(json))
            })
            .catch((error) => {
                console.warn('ERROR:', error)
            })
    }
}
In the example above, we first get data from the backend and then use said data with an action. Of course we can do more complex things in the controllers, like e.g. more complex communication with different backends.
How the other categories (marked with


Testing
To test our application, we use unit tests, as well as integration tests. Everything that is reasonable testable without using the backend, is tested with unit tests. Everything that would be really hard to mock, is tested with integration tests.
In our project, we unit test the react components, which is really easy, because they are almost always functional components. This does not mean, that stateful components should never be used. However, stateful components should only be used if necessary. Only use stateful components, if the state has something to do with the visual representation of the component. Never put business logic in your components! Putting business logic in your components is like putting business logic in the view of a MVC program. More on stateful vs stateless components can be found here
Furthermore, we also unit test the selectors and the actions together with the reducers. To test our react components, we use jest together with enzyme.
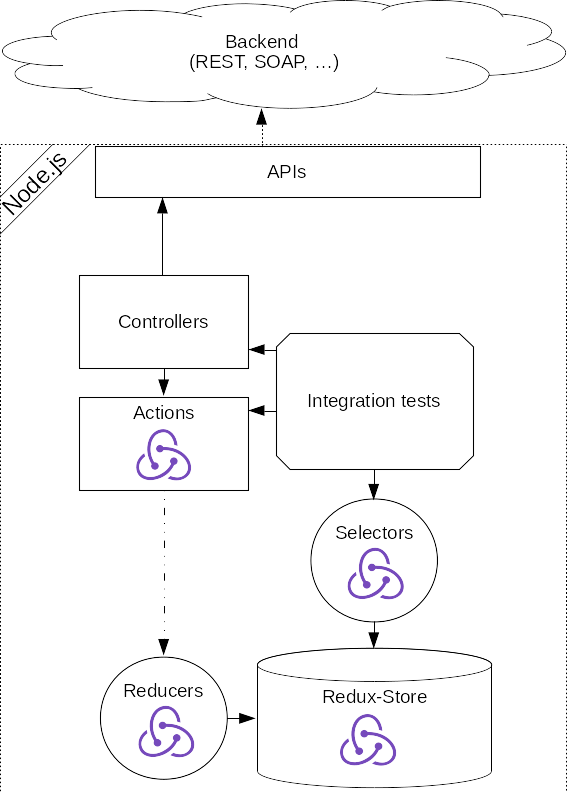
The Controllers and the APIs are tested (together with everything else) with integration tests, since they are heavily dependent on an existing backend. However, our integration tests test everything except the react components (which are already covered by the unit tests). So the integration tests replace the react components (so to say) and trigger all the functionality, stored in the Controllers and Action categories, which can be seen in the following graphic:

The integration tests run on node.js, as well as the unit tests. This means, that we can test every category and every component in our application, without starting the browser (which is awesome :-) ).
Of course we still need some selenium tests, to tests the application in different browsers. However, the amount of selenium tests can be reduced significantly.
Furthermore, “replacing” the react components with integration tests makes it very easy to write said integration tests, because you could say, that the integration tests are just another “view”.
So instead of having react components, which the user can use (by clicking, typing), you have the integration tests which take care of the interaction. Thus an integration test can be written like a user story and is therefore easy to understand.
An integration test, involving two sites which are implementet with react and redux and use the same backend could be testet as follows:
const storeSiteA = createStoreFromRootReducer(rootReducerSiteA)
const storeSiteB = createStoreFromRootReducer(rootReducerSiteB)

// changes something in the backend which affects the other site
storeSiteA.dispatch(siteAactions.someAction())
// expect the change to have an effect on the state
expect(siteAselectors.someSelector(storeSiteA.getState())).toBe(...)

// get data from backend
storeSiteB.dispatch(siteBactions.pullData())
// expect data to be what came from site A
expect(siteBselectors.getData(storeSiteB.getState())).toBe(...)
The actions and selectors which are used by the components are also used by the integration test.